Recently in Baking Category

Bad blogger! No cookies! Ok, one cookie...

| 1 Comment
Oh, hello. I'm still here.

Stupid life gets in the way of blogging, and all of a sudden it's three weeks between new posts. I was sick for almost 2 of those, and when I'm sick, I typically don't bake. That's not a great excuse, but it is one...

Speaking of baking, a friend has asked me to make dessert for her birthday party. I'm very excited by the prospect, even though I don't know what I'll be doing yet.

I've actually been cooking with tofu, and made a very good fried tofu with cabbage and mushroom. The secret to frying seems to be too much hot oil. Boy, is that delicious. Next thing to find out is how restaurants make their pressed-style stuff, 'cause it's awesome.

I'm actively trying to decide what I want Tofufighting.com to be. Other blogs do all the things I'm interested in doing, and they do it better. I'm the only person with my voice, though, so there is that. I think for now I'll post when inspired to.

I hope that won't be in another three weeks...

Black and White Cupcakes

| 1 Comment
I'm a lazy blogger, and I'll continue to be so for a while. That said, please enjoy the pictures of my birthday cupcakes. They're a basic chocolate cupcake with white or black frosting, and each then paired with an opposite-color accent. I used white sugar, white gel icing, black gel icing, chocolate chips, Hershey's Kisses, powdered sugar, Oreos, cookie crumbs, sprinkles, and Pocky, as well as a few interesting techniques to get some of the designs.

You'll notice they're all complimentary flavors, too (mostly chocolate and sugar) - the book I stole the idea from, the otherwise beautiful "Hello, Cupcake", looks great, but doesn't seem to mind if your vanilla frosting is paired with chewy licorice, or both soft cookies and hard candies. I wanted to make attractive and tasty treats, and I think I succeeded.

Click on any photo below for the picture on my flickr page, where you can see very high-res shots and a few others that I didn't post here. Enjoy!


P4170021

P4170016

P4170015

P4170013

Cookie Meet 'n Eat today!

Join me at the Tustin Marketplace today around 1pm and help me eat the cookies I baked this week. It's also a good chance to get out from behind the computer and sit down for lunch with old friends and new (plus there's about a thousand restaurants within a short walk of there).

I'll be at a table near the Sandwich World and Jamba Juice (by the old Tower Records, across the street from Taco Bell and El Pollo Loco). Let me know you're coming so I can look for you!

Dark and White Chocolate Chunk Cookies

For whatever reason, it's taken me much longer than it should have to consciously think of another treat (besides cupcakes) that's easy to make and distribute. I have a lot of baking plans, but I kept thinking to myself "cakes/tarts/custards/etc. are too difficult to give away in small portions", failing all this time to remember the classic sharing treat - cookies.

P3300031


Once again, this recipe is from "The Art & Soul of Baking", and it's pretty traditional as far as butter, white and brown sugar style (think: chocolate chip or oatmeal) cookies go. I went with a mix of white and dark chocolates - originally I was going to go all white, but I could only get 1 bar of Black and Green's White Chocolate (the only organic, and it's awesome, that I can find), so I added some dark I had handy. It's interesting how the white retained its shape very well, but the dark melted into the cookies more. They're small and tasty.

Dark and white chocolate chunk cookies

1 1/2 sticks (6oz) unsalted butter
3/4 cup (5 1/4oz) granulated sugar
3/4 cup (6oz) light brown sugar, firmly packed
2 large eggs, room temperature
2 teaspoons vanilla extract
2 1/4 cups (11 1/4oz) unbleached all-purpose flour
1 teaspoon baking soda
1 teaspoon salt
6oz white chocolate, in chips or chunks
6oz dark or milk chocolate, in chips or chunks

Preheat your oven to 350F.

Cream sugars and butter in a stand mixer (or with a hand mixer) until smooth and blended, about 2 minutes. Add eggs one at a time until each is just blended, then add vanilla and blend in.

In a separate bowl, whisk together flour, baking soda, and salt. Add to wet ingredients (all at once is fine, if your mixer bowl is large enough for a little mess) and blend just until there are no patches of flour visible. Add chocolate chips or chunks, and mix on low until well distributed.

Place tablespoon-sized (or ping pong ball-sized) mounds of dough on a non-stick baking sheet (or on parchment paper on a cookie sheet), and bake for 10-14 minutes, rotating once during cooking. Cookies will look brown on the edges but slightly pale in the center when they're done. Remove and let cool 5-10 minutes on the baking sheet before moving to a plate or cooling rack. Makes 50-60 cookies.

Thoughts and observations: Use whatever chocolate you have for this, but if you're using whole bars, make sure your chunks are small for this size cookie (no larger than pre-made chocolate chips). Cook a few minutes longer if you like a crisper cookie. You can also refrigerate this dough to make it easier to work with (and to have it spread out less when baking). Share and enjoy!

Vanilla cupcakes with citrus frosting

vanilla.jpgIt seems no matter what I post about or bake, nothing gets near the attention that my cupcakes do. I'm betting it's a "pretty dessert" thing in general, but so far cupcakes have ruled the roost here. No reason to stop now...

I found this recipe in "The Art & Soul of Baking", a fantastic book from Sur la Table - it's basic enough for new bakers to get a handle on, but detailed enough for us wannabe pros to get a lot out of it. It reads like an instruction manual, in every wonderful geeky way that's possible.

The book's got a lot in it for me to discover; the recipe below was my first find, and I like it a lot. I decided to literally go "by the book" and not skip on any instructions: I warmed my eggs to room temperature, creamed my butter and sugar together much longer than I usually have the patience for, and alternately added the dry ingredients (sifted, of course) and the sour cream to the creamed sugar and egg mixture - the resulting batter was surprisingly uniform and airy. "Surprisingly" because the cupcakes are rather dense - again, in a good way.

The frosting recipe didn't go along with the cake in the book, but I thought something lemony would be nice for springtime. The reason I'm calling this "citrus" is because you can use orange, lemon, or even lime if you'd like - all would work well. In all honesty, I'm not 100% sure I actually used a lemon, as it was rather green on the inside. "Citrus" is a nice safe word. Enjoy!

Vanilla cupcakes (adapted from Classic Yellow Layer Cake, from Art and Soul of Baking)

1 1/2 sticks (6oz) butter, softened
3/4 cup (5.25oz) sugar
3 large eggs, room temperature
1 Tbl. vanilla extract
2 cups (7oz) cake flour, sifted
3/4 Tsp. baking soda
1/4 Tsp. salt
1/3 cup (3oz) sour cream

Preheat oven to 350F.

vanillaall.jpgIn a large mixing bowl, cream together butter and sugar with an electric beater until smooth, 4-6 minutes. Add eggs, one and a time, and incorporate. Add vanilla. In a separate bowl, sift together flour, baking soda and salt. Combine dry mixture and sour cream into wet ingredients, adding 1/3 dry mix, then 1/2 sour cream, then 1/3 dry, then the rest of the sour cream, then the rest of the dry, fully incorporating each addition before adding more.

Using a small scoop or pipping bag, pour batter into cupcake papers, filling each about 2/3 of the way full. Bake for 16-20 minutes, rotating cupcakes once during cooking. Cupcakes are done when slightly springy to the touch, and when an inserted toothpick comes out clean. Allow to cool completely before decorating.


Citrus buttercream frosting

4oz cream cheese, softened
1/2 stick (2oz) butter, softened
2 to 3 cups powdered sugar
lemon, lime or other citrus fruits
Food coloring (optional)

In a mixing bowl, cream together cream cheese, butter and 2 cups of powdered sugar, and beat with an electric mixer until combined. Add juice of one lemon (or other citrus), careful to avoid seeds. Combine, adding more sugar to reach desired consistency. Add several drops of food coloring, if desired.

To fill, carefully cut out a piece of the center of each cupcake after cooling, and fill with frosting. You can replace the "cap" of your cutout if desired. Frost the top of each cupcake using a large, flat knife or spreader, or with a pipping bag.

vanillaopen.jpg
Thoughts and Observations: You certainly don't have to "fill" these - it's a bit of extra work, and the frosting is rich enough without adding more. But it makes a nice presentation and surprise on the first bite.

I realize my frosting recipe is kinda basic - frostings are next on my list to experiment with (before research, I had no idea a lot of frostings had heat involved at any step - color me surprised). Play around with it, remembering that you can always thin it out with milk, and thicken it up with powdered sugar. You can also go all butter and no cream cheese - I just happened to have some handy, and like the taste. Purists might be blowing a gasket at all this, but they can yell on their own food blogs. I added yellow color purely for show. I didn't do it for these pictures, but a garnish of finely grated lemon rind would round these out nicely. 


On the menu...

All sorts of baking, cooking, preparing, and eating to do this weekend:

Tonight I baked a variety of Amish Friendship breads - some muffins, some mini loaves, and a big loaf. They were all the same dough, but the variety in types is due mostly to wanting to make a bunch of muffins, but realizing I'd be up until 2 in the morning if I went that route. Instead, I made loaves to use up the huge batch of batter faster. If you'd like some, please ask.

Tomorrow I'm going to my first flavor tripping party - thrown by a foodie friend, even. I've acquired a bunch of very sour, very delicious kumquats to test the before-and-after effects of the miracle berries. I'm very excited!

Having some leftover maple syrup and an overinflated sense of my candy-making skills, I tried to make some maple caramel last night, but ended up instead with a sort of grainy maple meltaways, not quite a hard crack, but not at all soft. So what to do? Ice cream - I'll make a richer-than-usual ice cream, and incorporate the candy. I have high expectations for it.

Since it's been a while, Sunday might find me making pizza, cupcakes, or both. If you need me, I'll be in the kitchen.

Cutting it close...

I hate posting this late, but I said I'd post every weekday in March, and doggoneit, I've got another 14 minutes to entertain you.

That said, this'll be a short and sweet entry - emphasis on "sweet". I'll post the full recipe in a few days, but for Pi Day I made a Banana Cream Cheesecake pie (with homemade chocolate whipped cream), and try as I might to mess it up, it turned out as perfect as I could every hope for - great banana flavor, perfectly cooked crust, and a smooth, velvety texture. Note to myself for next time: I know you think block cream cheese is as easy to bake with as the organic whipped stuff at Trade Joe's. You're wrong. Go shopping special.

I'm pressed for time and energy this week, but you'll get your five posts. I promise, however, nothing involving either corned beef or cabbage for St. Patrick's day.

Happy Pi(e) Day!

therespie.jpgLong before Congress decided to recognize it, I gathered non-math geek friends together every March 14th for good conversation and good pi(e). In the years since those first small gatherings, my annual Pi Day celebration has grown to include St. Patrick's Day in a mid-March extravaganza of baked goods and green beer.

Even with my love of all things pi, pie, and baking, I'm not a big fan of actually making and rolling out my own pie crust - It's intimidating, and there are several nice companies that make them for me. Luckily pie crust is one of those things that can be made vegan by default (instead of requiring adaptation), and several commercially available products are. My favorite is Marie Callender's frozen crust - cheap, easy to use, and completely animal-product free (until you fill it up with something creamy, that is).

On that topic, below is my award-winning vanilla cream cheesecake pie recipe. I'm lazy today, so I'm going to copy/paste the two-pie amounts below, but you can halve it if one is enough for you. Enjoy!


Michael's Vanilla Cream Cheesecake Pie

2 9-inch pie shells or graham cracker crusts
1 large box instant vanilla pudding mix
2 1/2 cups whole milk
10oz no-bake cheesecake filling (or 8oz cream cheese combined with 1/2 cup sugar)
8-10 vanilla cookies

Whipped topping

1 pint heavy whipping cream
1/4 cup powdered sugar
2 tsp. vanilla


Directions

Bake and cool pie shells, if needed.

Prepare pudding/pie filling as directed on box, mixing pudding powder with 2 1/2 cups whole milk. Whisk two minutes. Stir in prepared no-bake cheesecake filling, whisk until mostly smooth (about 1 minute). Add 1/2 of pie filling to each shell and refrigerate for 10-30 minutes.

To make topping, add sugar and vanilla to heavy cream in a large mixing bowl, and using an electric mixer, whip for 3-4 minutes, until mixture holds soft peaks when beaters are removed. Smooth over the cooled pies using a large spoon or spatula, or pipe on using a piping bag. In a plastic zip-top bag, crush vanilla cookies by hand into small pieces, and sprinkle cookie pieces over pies.

Happy Pi(e) Day!

Carrot Cupcakes with Cream Cheese Frosting

| 3 Comments
carrot1.jpg
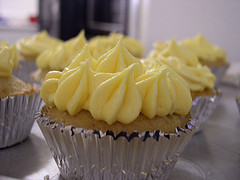
I made cupcakes. Again.

It's not that cupcakes are my only trick, it's that they're easier to handle and decorate than cakes, bake more quickly, easier to give away, and easier to eat. I'm thinking those factors are the driving force behind the cupcake's surge in popularity lately. Whatever it is, I'm deep in it.

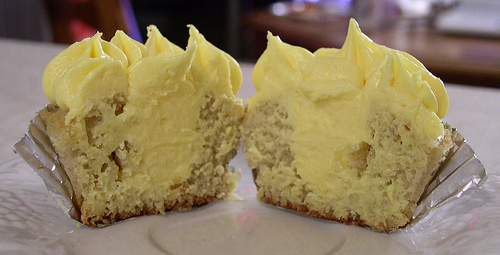
I've been craving carrot cake for a while - dense, rich, spicy, and much more substantial than most other cakes. I've found it's also one of those "I don't like cake, but..." type desserts - it stands out for people. I didn't have a good recipe, so I went with Alton Brown's overly fussy take, and it turned out pretty well. As directed, I didn't include any nuts or raisins, but I may next time - they still turned out really well.

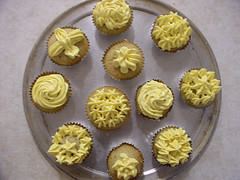
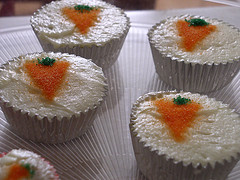
As you can see, I also went a little wacky with the decorating. Instead of pipping a carrot onto the frosting, I used a triangle stencil and homemade orange powdered sugar to apply the designs. I then capped the carrots with green sugar crystals, and both the orange and green "melted" into the frosting, creating an interesting effect. A little messy, but not bad for my first such attempt. Recipes and instructions are below.

Also! If you'd like one, I'm going to be somewhere I can give them away on Tuesday, March 10. Watch for more details, or email me for more info!


Carrot Cupcakes with Cream Cheese Frosting
Adapted from Alton Brown's recipe here.

12 ounces, approximately 2 1/2 cups, all-purpose flour
12 ounces grated carrots, fine grate (approximately 6 medium)
1 teaspoon baking powder
1 teaspoon baking soda
1/4 teaspoon ground allspice
1/4 teaspoon ground cinnamon
1/4 teaspoon freshly ground nutmeg
1/2 teaspoon salt
10 ounces sugar, approximately 1 1/3 cups
2 ounces brown sugar, approximately 1/4 cup firmly packed
3 large eggs
6 fluid ounces plain yogurt
6 fluid ounces vegetable oil

Preheat oven to 350 degrees F.

carrot2.jpgPut the grated carrots into a large mixing bowl and set aside.

Combine flour, baking powder, baking soda, spices, and salt in a large bowl and mix well. Add this mixture to the grated carrots and toss until they are well-coated with the flour. Work the carrot mixture with your fingers to get out any large carrot clumps.

In another bowl, combine the sugar, brown sugar, eggs, and yogurt, and mix until combined. While mixing, drizzle in the vegetable oil. When integrated, pour this mixture into the carrot mixture and stir until just combined.

carrot4.jpg
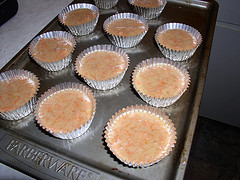
Pour batter into cupcake pans (use cupcake wrappers for best results, otherwise liberally grease pan) and fill to 3/4 full. Bake for 15 minutes, rotate in your oven, then bake for another 5-10 minutes, until the cake reaches 205 to 210 degrees F in the center (or a toothpick, inserted in the middle, comes out clean). Allow to cool completely before decorating.


Cream Cheese Frosting


8 ounces cream cheese
1-2 ounces unsalted butter (1/4 to 1/2 stick), room temperature
1 teaspoon vanilla extract
9 ounces powdered sugar, sifted, approximately 2 cups

In a large bowl, combine cream cheese and butter (I use a stand mixer, a hand mixer would work fine, as would a large fork, though your arm may never forgive you) until just blended. Add the vanilla and beat until combined, then add the powdered sugar, a little at a time, and beat until smooth. Place the frosting in the refrigerator for 5 to 10 minutes before using.


Sugar Decorations

carrot7.jpg
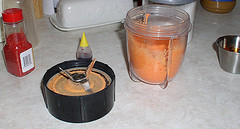
There are a lot of ways to do this - I used the ingredients I had handy. You could use orange sugar crystals, all granulated sugar with red and yellow (or orange) food coloring, or any other tricks you know. The important parts are adding enough granulated sugar to remove excess moisture, and blending until fine).

1/8 cup red sugar crystals
Yellow food coloring
1/4-1/2 cup white granulated sugar
X-acto or art knife
Small, thin piece of cardboard (larger than a cupcake - 2"x2" or bigger)
Green sugar crystals to garnish

In a small container, combine red sugar crystals with 10-20 drops of yellow food coloring, and stir in completely. Add granulated sugar and combine until desired color is reached (adding more food coloring and white sugar as needed). When no longer wet, put mixture into a food processor or small mixer, and blend, pulsing and shaking caked sugar down into the blades. Final product should resemble superfine sugar.

carrot5.jpg
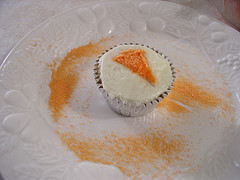
Using a small art knife, cut a triangle hole in the cardboard to desired size to make a carrot stencil. Hold stencil over frosted cupcake and dust orange sugar to make a design on the cupcake. Sprinkle a few green sugar crystals on top of triangle to finish the carrot. Sugar colors will "bleed" slightly over time.

Thoughts and Observations: The cupcakes are dense, so you might want to reduce the temp to 325 and bake a little longer - mine browned slightly on the bottom. I didn't include raisin or nuts, but there would be no harm in doing so. If you like a spicier cake, I think you could easily double (or more) the amount of allspice, cinnamon and nutmeg. I find I have pretty good results when weighing ingredients instead of just using volume measurements, but either way should work. I do contend that a kitchen scale is the best tool I never knew I needed until I had one. More process shots (and larger versions of the above pictures) of the cupcakes are available here.

Sneaky Tofu and Cheese Stuffed Shells

| 3 Comments | 1 TrackBack
You know, for being called "Tofu Fighting Dot Com", I don't write much about tofu. I blame this partially on my recent obsession with baking - well, baking cakes, cookies, and other things that don't require tofu, that is.

I do like tofu, however, and in a lot of forms. As a generic "meat replacer" in savory dishes, it often does the job. Baked, seasoned and thinly sliced (usually bought from the store pre-made like this), it's one of my favorite ramen additions and sandwich toppings. In soup, it works great just boiled along with everything else.

The reason this comes up (and why it's on my mind) is that I also love sneaky uses of tofu. For example, tonight's stuffed shells with mushrooms and tomato sauce has 1/3 block of the stuff, mixed finely with the ricotta and mozzarella cheeses. I've found it adds an interesting nutty flavor while cutting fat and calories in the dish.


Sneaky Tofu and Cheese Stuffed Shells

Ingredients

8 - 12 large "stuffing shell" pastas
2 - 4oz tofu (any firmness)
4 - 6oz ricotta cheese
6oz mozzarella, grated
1 - 3 teaspoons salt
Italian spices, fresh or dry, to taste
1 egg
Tomato, cream or other pasta sauce, jarred or fresh.
1oz Parmesan cheese, grated

Directions

Cook pasta shells according to package directions for al dente. Prepare filling, below, while they're cooking. Preheat oven to 425 degrees.

Using your hands, mash the tofu in a large bowl until it has a uniform fine consistency. To the tofu, add ricotta and 4oz of the mozzarella cheese and mix with Italian spices (dry "Italian Spices" are fine, or add fresh basil, finely chopped) to taste. Add salt as needed. Add egg and combine into mixture.

Prepare a non-stick or glass bread loaf pan or small baking dish with a thin layer of your preferred sauce. Once the pasta is cooked, drain and rinse under cold water until you can handle it. Using a spoon, fill each shell with the cheese and tofu mixture - overflowing a bit is fine -  and place the stuffed shells (open side down) into the baking dish. When finished, cover the shells with more of your sauce, then top with Parmesan and remainder of mozzarella cheese.

Bake, covered (with foil or glass lid), for 35-40 minutes at 425 degrees, or until sauce is bubbling on the inside walls of the dish. Uncover and cook 5-10 more minutes, until cheese is melted and beginning to brown.

Cool 5 minutes, plate and enjoy! Serves 2-4.

Thoughts and Observations: You can use whatever sauce you like, and add whatever else you enjoy to either the stuffing mix or the pan. I love mushrooms, so I usually sauté a large batch (4-8 oz) along with my pasta dishes. Spinach, garlic and onions all work very well. I also enjoy mixing sauces with this (and all baked pastas) - try a layer of tomato on the bottom and top it with something creamy. 

About this Archive

This page is an archive of recent entries in the Baking category.

Best Mexican in OC is the next category.

Find recent content on the main index or look in the archives to find all content.